Saturday, December 7, 2024

SPRINKLER SYSTEM 101

 Thank you for joining us today at Fresh's Workshop. If this is your first visit, welcome! If you're returning, we appreciate your continued support.

This is the spot where we build and repair all kinds of cool stuff, along with making a ton of saw dust. (Man Glitter.)

During our last session in the Workshop, we did a quick tile job in my office/radio room.
Click here to revisit that fascinating and educational project.

Before we begin today's project, let's take a moment and talk about shop safety:

Be sure to read, understand and follow all of the safety rules that come with your power tools. Knowing how to use your power tools properly will greatly reduce the risk of personal injury. And remember this, there is no greater safety rule than to wear safety glasses.

A few weeks ago, we fixed a water line leading to the house, which required cutting through a sprinkler line. 
After repairing it, we tested the sprinklers and found that three zones weren't working. Today, we plan to diagnose and fix these issues to bring the sprinkler system back to full functionality.

First, find out what three zones are not working. 

That requires turning each zone on, then walking the yard to verify that the zone is working.

Our research found that Zones 5,6, & 7 were non functional.

According to the controller, zones 5, 6, & 7 work off of the second module in the controller.
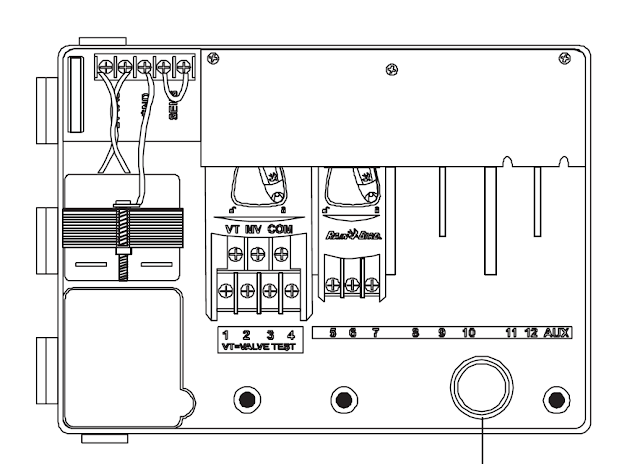
In our case, we have a 10-zone system, so there is an additional module above 8,9, & 10
No, I did not do the wiring on this

To diagnose the issue, use a multimeter set to AC volts to test for voltage between the COM and Zone 5. Activate Zone 5 on the controller and check for voltage. If there's no voltage, proceed to test Zones 6 and 7 similarly. You can also remove the wire to the system when you test, in case the valve is shorted.

It seems we may have a defective module. If there had been voltage output from the module, the subsequent step would involve inspecting the wiring to the water valves for that specific zone.

Therefore, we should proceed with ordering a new module.


CONTROLLER MODULE

When installing the new module, ensure that you use the correct wire for each zone. The zones will function properly, although the zone numbers will be altered. I simply transferred everything from one module to another, slid it back into place, and used the locking knob to secure the module.

Now we can close up the controller and set the system to run Zone 5.

And Bob's your uncle.

Now that all the zones are operational, we need to check each one for any malfunctioning valves or sprinkler heads.

As we move forward, we will develop a diagram for each zone and its corresponding sprinkler heads. This will assist us in assessing whether any adjustments or replacements are needed. (I am presenting one of the diagrams to give you an idea of how it was created.)

I've created a drawing of the front yard from the right side of the driveway, depicting the first four zones along with the sprinkler boxes. (not to scale)

It is advisable to conduct regular inspections, as a flowerpot may inadvertently cover a sprinkler head. 

These two instances clearly show pots being added without verifying the sprinkler positions. These two sprinkler heads need to be moved about 8-10 inches outward. The sprinkler system in question is designated for lawn irrigation, while the potted plants are watered through a distinct 'dripper' system.


The inspection of Zone 1 uncovered two damaged heads requiring replacement. 

Now we can start replacing the nonfunctioning sprinkler head.

Simply dig down to expose the sprinkler head, unscrew it, and replace it with a new one. Ensure it's the same type as there are various models, and the home center should stock them all. For instance, the Zone 1 heads along the road spray only a 180-degree arc, while the Zone 4 unit near the driveway and sidewalk has a 90-degree spray pattern.

Make sure that the head does NOT stick up above ground level. Trust me on this, as I have run over my share of sprinkler heads with the mower.

Let's take a look at the anatomy of the yard system.


Water from the main supply enters through the on/off valve and then moves to a backwash valve. This valve prevents any water from the yard system from flowing back into the main water supply. The water then flows to a valve for ZONE ONE. The white pipe to the left of the Zone valve distributes water to three other zone boxes. (The image was captured during an overhaul I conducted a few years ago.)

That's how simple it is. Water comes in and goes to each ZONE Valve. The zone valve is controlled by the controller box. (in the shop) It really is quite simple when you look at it this way.

Every problem can be broken down into its simplest components. 

We learned a ton about sprinkler systems when we had the 'Bitch Barn' built a few years ago. 

We had to move a ton of pipes to make room for the new construction.

I had to get creative here with the PVC.

Having an abundance of pictures for reference is beneficial. Occasionally, one might accidentally install a Ham Radio Antenna Mast over a water line.

A trip to the hardware store was necessary.
As was an adult beverage


I still have some work to do. We have a few heads we need to move
and an intermittent valve to look at, but hopefully you got the idea.

I will update you when we get that work done.

Coming up next here in the shop:

It's back to the garden, as we build a Mason Bee House.

Let's see how closely I can recreate this one.

See you soon!


Be sure to visit some of my other blogs:

AROUND THE KITCHEN  - SEE WHAT I COOK

BRIARWOOD - YOU CAN READ MY NOVELS

AUDIO CONSOLE - WHERE I AM BUILDING AN AUDIO MIXER

DISCLAIMER The information contained here is for ENTERTAINMENT purposes only. Working with woodworking tools can be dangerous. The user of these tools should have a basic knowledge of woodworking and be familiar with the proper use and safety precautions associated with these tools. Always wear appropriate personal protective equipment, such as safety glasses, ear protection, and a dust mask. Always use the tool in accordance with the manufacturer's instructions and guidelines. Always maintain a safe and organized work area.


God Speed, Mother Nature


Saturday, November 30, 2024

HOW TO TILE A FLOOR

Thank you for joining us today at Fresh's Workshop. If this is your first visit, welcome! If you're returning, we appreciate your continued support.

This is the spot where we build and repair all kinds of cool stuff, along with making a ton of saw dust. (Man Glitter.)

During our last session in the Workshop, we fixed a water leak and a confused washing machine.


Click HERE to see that episode) 

Before we begin today's project, let's take a moment and talk about shop safety:

Be sure to read, understand and follow all of the safety rules that come with your power tools. Knowing how to use your power tools properly will greatly reduce the risk of personal injury. And remember this, there is no greater safety rule than to wear safety glasses.

Today, I'm tiling the floor of my office/radio room.

Back in 2017, when we purchased our retirement home, we opted for flooring. Having a dog, we ruled out carpet, and Penny was against tile.

Eventually, the flooring succumbed to the wear and tear from my office chair. I removed it, exposing the concrete beneath.

The concrete proved difficult to keep clean, prompting our decision to switch to tile.

In my previous office at our old home, we installed industrial-grade glued-down tile. It was costly and required extensive maintenance, leading me to discard this option.
We had also had good results with black and white self-adhesive tiles in a bathroom also at our former residence, so we're going with tile again.
This is the only picture I could find; that's 'Cooper' in the sink.
As mentioned, that floor remained in good condition, so we opted to use it again in my office. During a recent visit to Gainesville, we made a stop at an Ollie's Bargain Center.
And they had some tiles that Penny believed would look fantastic.
 
The first step is to calculate the number of tiles needed. Start by measuring the room's dimensions. Our room is 8 feet 4 inches by 7 feet 6 inches.  We would round up to 9 by 8 feet. Multiplying these numbers gives you 9 x 8 = 72, so we will require 72 square feet of tiles. 

The tiles at Ollie's are sold in packs of 25 square feet, so we purchased three packs.

The next step is to find the room's center, which is 5 by 8. Draw a diagonal line from one corner to its opposite, then repeat with the remaining corners. The intersection of these lines indicates the room's center. Or you can do it my way (see below)
That's the best drawing you can do ???  Hey, I never said I was Van Gogh
Returning to the floor.

Select a tile and position it at the center of the room as close as you think.

Ensure the tile is centered, providing equal distances to both the left and right walls.

Then, align the tile equidistantly to the north and south walls.

This establishes our starting point.

Mark two opposite corners with a marker.

All we do now is peel and press.

Ensure that all your tiles are oriented in the direction indicated by the arrow on them.
Now, you can proceed with laying the full tiles in the center of the room.

Utilize a large brush to remove any debris from the area.
Make sure the corners are exact. Press down firmly along all the seams with your fingers. Apply pressure to the center of the tile as well.
When encountering a smaller section, measure the gap and then mark the back of your tile, making sure the arrows are pointing in the correct direction. Ensure the fresh, uncut side is against the adjoining tile.

Utilize a ruler to score the tile at the marked line. Then, bend the tile and employ a razor knife to complete the cut.


Upon closer inspection, you may notice some tiles have slightly different colors. This discrepancy is due to the second box of tiles not matching the color indicated on the label. Such are the quirks of purchasing from a discount retailer. However, considering this is merely a closet and the tiles were 75% cheaper than the stick-on options at the home center, it's a compromise I'm willing to accept.

To prevent any issues, select your tiles more cautiously, or remove all the tiles and stagger them. You may even conceal them in a less visible area, such as beneath your desk.

Now that 75% of the tiles are in place, I think I'll take a break and come back to this project in a few days. I started today because I wanted to make sure we had enough tiles, and we do. We're going to Gainesville tomorrow, so I needed to know whether I should stop at Ollie's.


A few days have passed, and now I'm prepared to complete this project.

We had a great time in Gainsville.
Our 'go-to' spot for an Indiana Breaded Tenderloin sandwich is just north of the University of Florida Campus on 13th Street.
Let's complete the flooring. The constant up and down is exhausting; it's time to wrap this up.

With that, you now possess a beautifully tiled floor that will be easy to maintain.

For anyone worried that my chair might damage the floor, Penny has ordered a lovely rug for the room.

The threshold and moldings remain to be done... Another day. I am exhausted and parched.
I could have possibly achieved a superior result with higher-end tiles or by adhering them to the floor. Nevertheless, I chose not to undertake the extra expense and effort. Had I been tiling a primary room; I would have avoided the shortcuts taken in this project.

In summary, I am quite satisfied with the outcome. It is a considerable improvement over a mere bare concrete floor.


Next week, we'll revisit our lawn sprinkler system to address a defect that came to light during our recent water pipe repair.

Currently, I'm in the mood for a refreshing adult beverage.

See you soon!

Be sure to visit some of my other blogs:

AROUND THE KITCHEN  - SEE WHAT I COOK

BRIARWOOD - YOU CAN READ MY NOVELS

AUDIO CONSOLE - WHERE I AM BUILDING AN AUDIO MIXER

DISCLAIMER The information contained here is for ENTERTAINMENT purposes only. Working with woodworking tools can be dangerous. The user of these tools should have a basic knowledge of woodworking and be familiar with the proper use and safety precautions associated with these tools. Always wear appropriate personal protective equipment, such as safety glasses, ear protection, and a dust mask. Always use the tool in accordance with the manufacturer's instructions and guidelines. Always maintain a safe and organized work area.
God Speed, Mother Nature


HOW MANY TOOLS DOES IT TAKE ??

Thank you for joining us today at Fresh's Workshop. If this is your first visit, welcome! If you're returning, we appreciate your co...