Thanks for joining us today here at Fresh's Workshop. If you are a first-time visitor, WELCOME. If you have been here before, THANKS for coming back.
This is the spot where we build and repair all kinds of cool stuff, along with making a ton of saw dust. (Man Glitter.)
Last time in the Workshop, we made a new handle for the Big Green Egg.
BIG GREEN EGG HANDLE (Click on the link to see that episode)
Before we begin today's project, let's take a moment and talk about shop safety:
Be sure to read, understand and follow all of the safety rules that come with your power tools. Knowing how to use your power tools properly will greatly reduce the risk of personal injury. And remember this, there is no greater safety rule than to wear safety glasses.
Today, we are going to build some baskets for our Orchids.
My father cherished his orchids. His retirement home in Florida was adorned with many orchids, yet this one was my favorite.
Dad passed away in 1997, yet his orchids continue to flourish. One has adorned our fence or tree since that year.
Several years back, we divided it into four separate orchids and gave them away. It's time for another separation. (The Master Gardener in our family will handle that task.)
Hence, we're in need of some baskets for the new divisions.
Really, you want $90.62 for this? Well, I have to admit, I did not notice that it comes in a pack of 6, making the cost $15.10 each.
My bad.
In all fairness, Lowes has the same basket for around 12 bucks,
We can still do better.
Here is one idea for a prototype.

I like the look of this planter. Can I turn this idea into an Orchid Basket?
No, but I like the idea, maybe another planter in our future?Let's head out to the shop and get creative!
I have 3 cedar fence slats that I bought from Lowes.
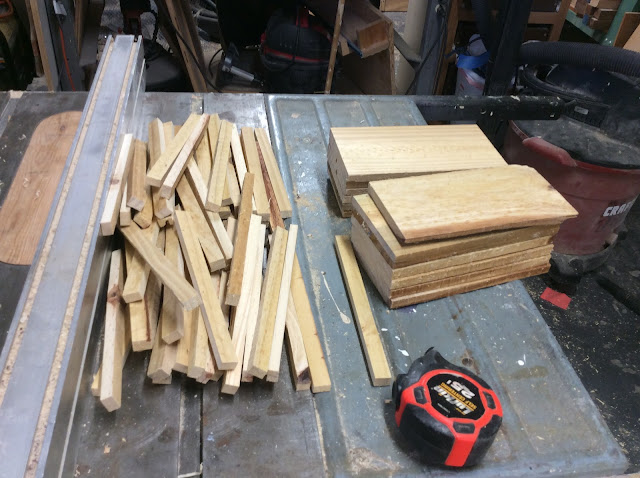
Let's cut them into 8-inch pieces.
Now we can cut those into 1/2-inch strips
Time to clean the saw guide.
We'll stop there. These should be enough for a prototype.
Now we can cut those into 1/2-inch strips
Time to clean the saw guide.
We'll stop there. These should be enough for a prototype.
I have a large amount of Cypress wood scraps remaining from my kitchen cabinet project.
For my baskets I used 14-gauge STEEL wire. I had it on hand, but you can get it locally or thru AMAZON. STEEL WIRE
Now I put a bolt in my vice.
Cut a 12-inch length of wire. Begin wrapping it around the bolt four inches from one end, making approximately four turns. The bolt's threads will guide the wire as it wraps. Create four of these. When finished, the wire can be easily unwound.
To drill holes in the pieces, we assembled a jig for the drill press. Just slide the slat into the groove and proceed with drilling.
(Drilling Tip 836) If your drill bit starts to wander, stop drilling. Turn the piece over and continue drilling from the other side.
Now, onto sanding. You may choose to skip this step if the item is meant for outdoor use and will be exposed to the elements. However, I prefer to sand it anyway.
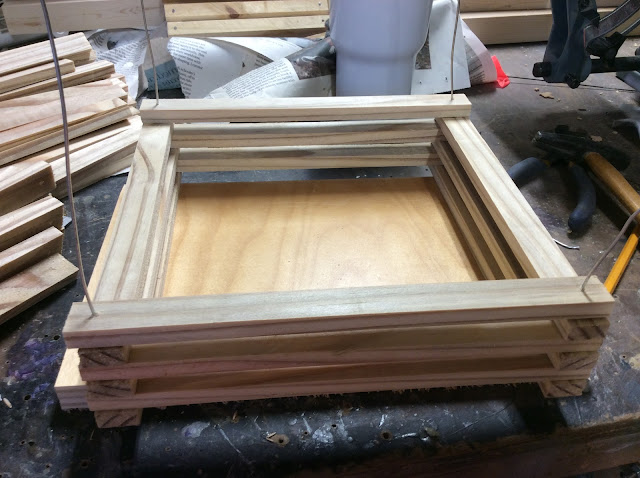
At the workbench, thread the wire through the end of the first slat. Remember, we are assembling this upside down, so begin with the first layer accordingly.
And keep stacking them.
I noticed that the end curls were getting crushed, so I crafted an additional jig to elevate them from the bench.
I placed a wedge under the slat to assist with the nailing process. For the subsequent version, I constructed the bottom on the bench and then attached it to the basket as a complete assembly. Details on that will follow.
Trim the surplus wire and coil it behind the slat.
Almost done.
Now, ensure the slats are even at both the top and bottom. Cut two pieces for the top and two for the bottom. Then, glue and clamp them in place.
I noticed that the end curls were getting crushed, so I crafted an additional jig to elevate them from the bench.
Now, let's begin constructing the bottom layer, starting with the end piece.
Use a slat as a guide to create the gap, pre-drill, and then drive in a nail. Remember to apply a dab of glue before nailing.I placed a wedge under the slat to assist with the nailing process. For the subsequent version, I constructed the bottom on the bench and then attached it to the basket as a complete assembly. Details on that will follow.
Trim the surplus wire and coil it behind the slat.
Almost done.
Now, ensure the slats are even at both the top and bottom. Cut two pieces for the top and two for the bottom. Then, glue and clamp them in place.
 Congratulations on creating your first Orchid Basket, as it's also a first for me. Now, let's evaluate what changes we might want to make. To begin with, the slats seem too thin. It's become apparent that not all Cedar boards share the same thickness. Additionally, the basket being replaced measures 10 inches. While Penny may prefer the ends protruding, I do not. Therefore, we should acquire another cedar board to address these concerns.
To address the width problem, I passed the board through my surface planer.
Now, cut them to the desired width. Ensure the clean edge is against the saw fence. For this version, they should be cut to 3/4" in width.
Now that the slats are cut, we need to reset the jig to accommodate the new width and proceed to drill our holes.
Begin by constructing the base. Avoid gluing the end pieces as they serve to maintain the base's square shape. These end pieces will be removed shortly.Begin by placing a spacer, followed by hammering in the initial piece.
Once completed, remove both ends and set them aside to allow the glue to dry. (Ensure that you are using glue suitable for outdoor use.)
I discovered that drilling holes in the plywood to protect the ends was unnecessary. Simply placing a piece of plywood under the center sufficed.
Assemble the basket in the same manner as we did above.
And there you have it.
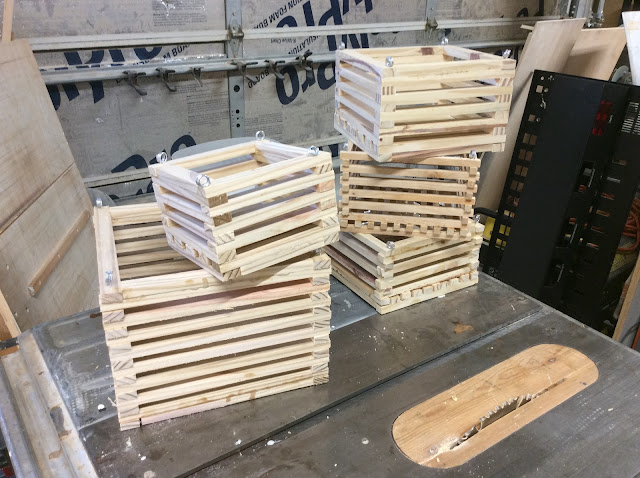
The third attempt was successful. (I didn't present you with version 2.) We now have a lovely basket for Dad's Orchid. There's just one issue... she now desires more. That's fine. I plan to remain in the shop and craft another 10-inch basket. And while I'm at it, I may as well create a few 8-inch ones too. What about some 6-inch baskets? Or perhaps one of these:
I guess I'll be busy for a while.Next time on Fresh's Workshop, we'll delve into gardening. We're going to construct a plant stand that Penny can place in front of a window to begin growing some of her plants.
See you then.
Be sure to visit some of my other blogs:
AROUND THE KITCHEN - SEE WHAT I COOK
BRIARWOOD - YOU CAN READ MY NOVELS
AUDIO CONSOLE - WHERE I AM BUILDING AN AUDIO MIXER
DISCLAIMER The information contained here is for ENTERTAINMENT purposes only. Working with woodworking tools can be dangerous. The user of these tools should have a basic knowledge of woodworking and be familiar with the proper use and safety precautions associated with these tools. Always wear appropriate personal protective equipment, such as safety glasses, ear protection, and a dust mask. Always use the tool in accordance with the manufacturer's instructions and guidelines. Always maintain a safe and organized work area.

.JPG)


No comments:
Post a Comment